When my gorgeous godson was born, I decided that every year I would take it upon myself to make his birthday cake. Birthday number one was fun and I totally aced his pinata cake.
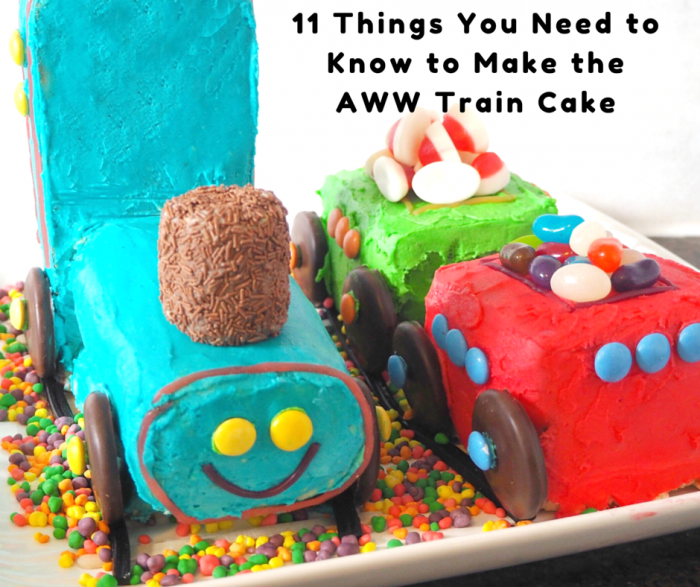
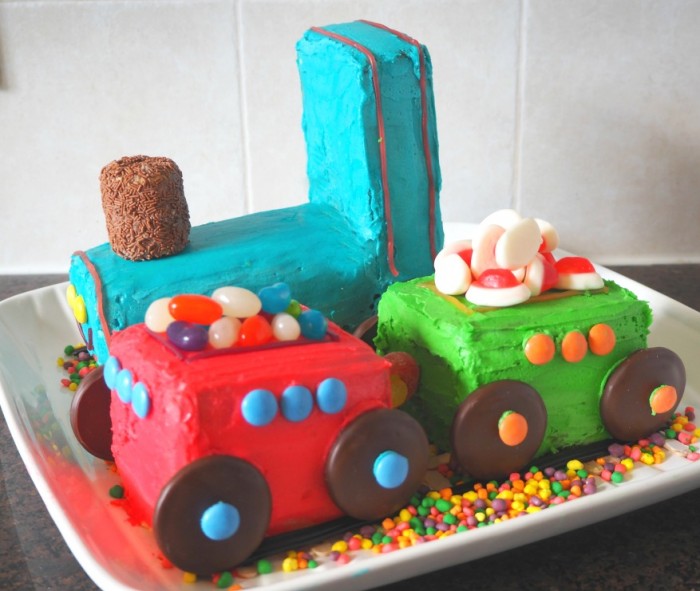
Clearly, it’s not called the Terrible Twos for nothing, because after kindly buying me the AWW Children’s Birthday Cake Book for my birthday, David volunteered us for the Choo-Choo Train Cake for birthday number two, one of the hardest cakes in the book. This wasn’t how I dreamed I would pop my AWW Children’s Birthday Cake cherry. This was not a dream, it was a nightmare.
After extensive googling, I found there were whole forums discussing how to make this cake which is never a good sign. My friend’s mum’s only advice was “may the Cake Gods be looking down upon you.” She should know, with three grown up kids (who all have with kids of their own,) Sue has pretty much worked her way through the book. I then turned to the good people of Facebook, because there’s nothing they don’t know. They didn’t let me down.
I’m pleased to report that our train was not a wreck at all, it was a choo-tastic success but we did learn some important train cake lessons, and we learned some of them the hard way! If you want to take on the challenge of the train cake, here’s what you need to know!
1. Preparation is Key
This cake isn’t really difficult but it is a lot of work. The more you can prep ahead of time, the smoother the ride will be.
DO bake and freeze the cakes ahead of time.
DO make the icing before you decorate and DO ice the cake the night before. This is not a cake you want to assemble or ice at the last minute. Trust me, I know! However, save some buttercream so you can add the wheels and smarties on the carriages just before serving.
2. Which Cake Tin?
The AWW calls for a 25cm x 8cm bar tin which I’m sure was a revolutionary piece of baking equipment at the time the book was published, but I’m pretty sure, doesn’t exist anymore. I scoured a range of reputable baking stores, the internet and all my friends’ baking equipment and I couldn’t find one of those tins anywhere. A loaf tin will work just as well. Cut the cakes to the correct size before freezing (see below.) There will be lots of scraps and leftovers, which you can eat for the fun of it or upcycle in some very delicious ways.
3. Which Cake?
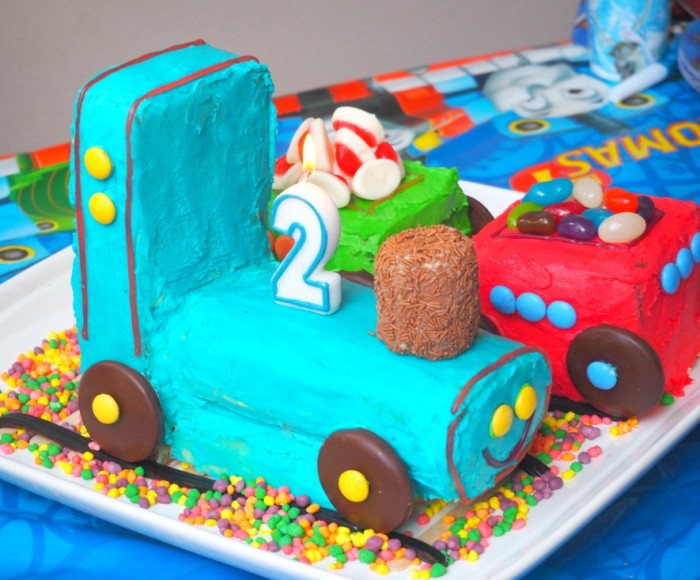
The AWW recipe calls for packet cake but I use this recipe which is as quick as any packet cake mix and has the added advantage that I know exactly what’s in it! It’s much easier to make the cakes, cut them to size and throw them in the freezer until you need them. Using this recipe, I needed to make about 4 loaves; 1 quantity of cake mix for each loaf and this made 4 carriages, the bases for the carriages and the back and the base of the engine. In case you were wondering, our carriages measured 10cm x 9cm x 7cm.
The AWW recommends using a shop bought swiss roll and so do I. Unless you have nerves of steel or you are a swiss roll ninja do not attempt making your own, you want this train ride to be as smooth as possible. While, you’re at it, buy a pack of mini rolls, cut one in half and use it for the funnel. Eat the other 7 and a half. Think of it as a perk of the job! Don’t forget to freeze the swiss roll and the mini rolls too.
4. Freezing The Cake
Making the cake ahead of time, saves time, energy and a lot of stress. Cut the cake pieces to size, wrap in two layers of plastic wrap, one layer of foil and label the cake pieces, if necessary. This will make for a seamless and pleasant decorating experience. Do not, I repeat, do not defrost the cakes before decorating. Decorating a frozen cake is easy as pie. Decorating a defrosted cake is like a crumb apocalypse.
5. Assembling the cake
We used jam and a bit of white buttercream to stick the bases to the carriages and the base and back to the engine. We did this when the cakes were still frozen, just before we applied the crumb coat.
6. Finding Decorations
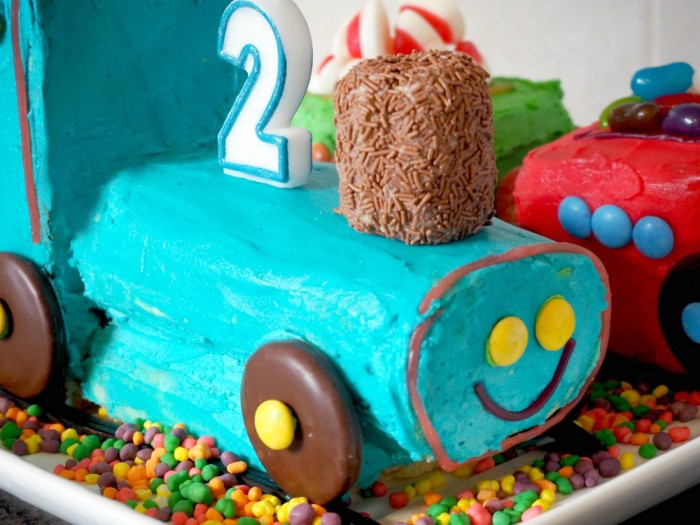
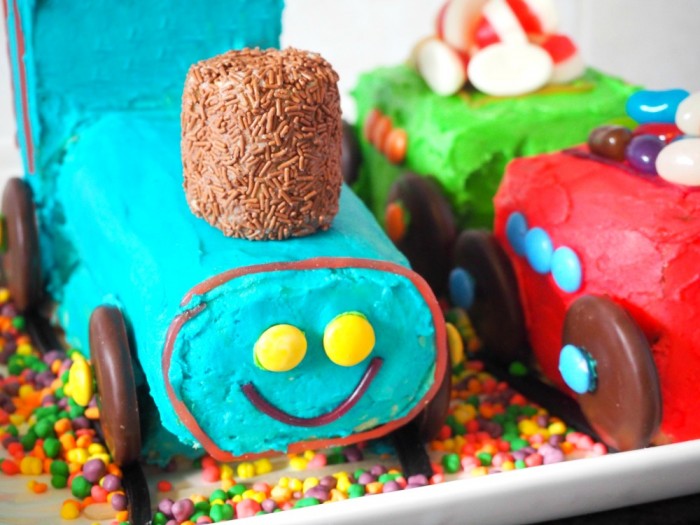
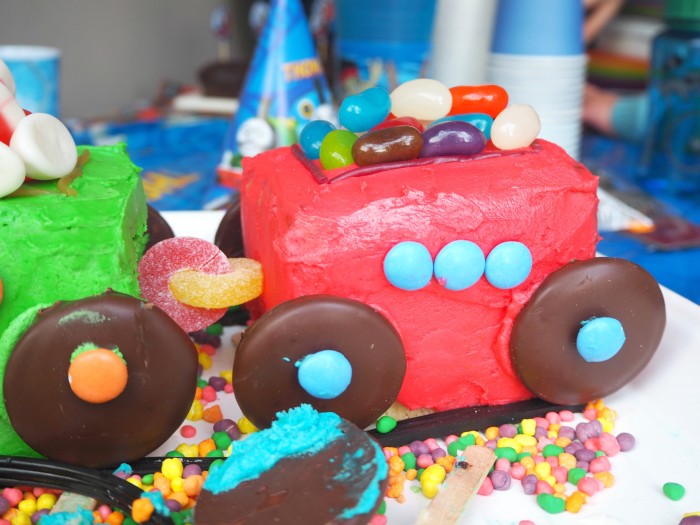
I used Mint Slices for the wheels which sent the grown ups into a frenzy of excitement. Remember, that the engine and each carriage will need four wheels and do the math… Otherwise you might find yourself running round the supermarket in your pyjamas at 7am on a Saturday morning restocking your biscuit supply. I may or may not be talking from experience.
I couldn’t find black licorice string anywhere but I did find 2 metres of licorice which we cut up for tracks. I did manage to find fruit strings though and they were great for outlining the tops of the carriages. I hunted in every supermarket in a 10 mile radius (or so it seemed) and finally found the jube rings in a 2 dollar shop. Go figure! In the end, I only used 2 and ate the rest of the packet (in the name of research.)
7. How to Present the Cake
Unless you’re an avid DIYer and you have a random 1 metre piece of MDF lying around, it’s unlikely you’re going to have a board long enough to accommodate your train, particularly if you have more than two carriages. A trip to your local DIY store might be the order of the day, or just use the largest platter you have, like we did.
8. Making The Track
We stuck our lolly sticks down with writing icing which was great while it lasted (which wasn’t very long) but not so great after. I wish I could find a way of telling you of a magic way to stick the licorice tracks, but I can’t because it’s pretty much unstickable. If like us, you’re a bit OCD and can’t bear the thought of your tracks being anything less that perfectly aligned, chuck a box of nerds over the base of the cake, to look like gravel. It covers a mulitude of baking and icing sins, and brings a splash of colour to the whole affair. Of course, if you’re using a tray without an edge, do not use Nerds unless Nerd carpet is your thing.
9. Making The Icing
I use this recipe which makes perfect buttercream every time. I used tubes of food colouring, a few drops give bright, vibrant colours on the icing but not in everybody’s mouths. I’m still a bit traumatised about the time I turned my tongue and teeth blue.

10. Decorating The Cake
Making this cake was like a crash course in cake decorating. Here’s what we learned…
DO ice the cake frozen.
DO a crumb coat on the cake first. Give it a thin coat of white buttercream, it’s perfectly OK to have some crumbs in the icing, this is just an undercoat! After dirty icing, refrigerate for at least 30 minutes or until the icing is stiff to the touch.
DON’T ice the cakes on the presentation board, unless you want coloured icing everywhere. Carefully move the coloured cakes into position with a palette knife.
DO smooth any bumpy bits with a small palette knife dipped into some hot water.
DO ice the cake the night before unless you’re a fan of frayed nerve endings.
11. Transporting the cake
Do this with utmost care. It’s a good idea to take a first aid kit for your cake with some extra buttercream and decorations should anything fall off or get damaged in transit.

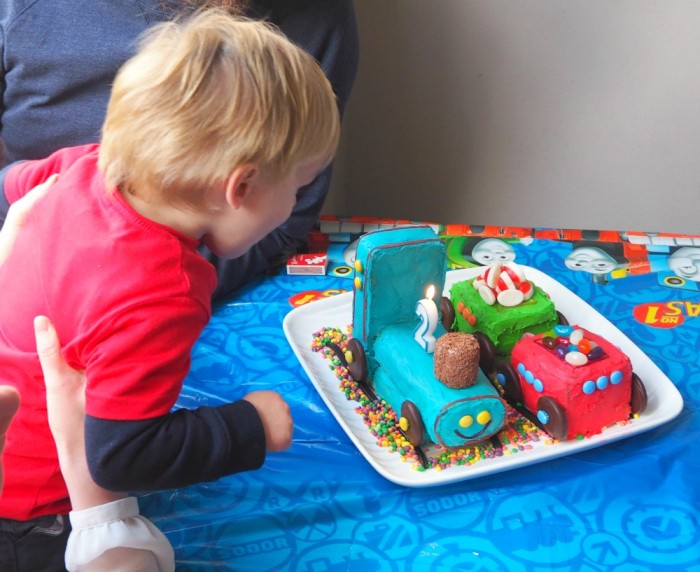
I’m not going to lie. This cake was brought to you by blood, sweat and (almost) tears and nearly ended in divorce. It was totally worth it though, for the look of pure happy on the birthday boy’s face. That said, next year, I’m choosing the cake and it will be from the “Easy Cake” part of the book. Let’s not think about that now though, because it will take me the next 12 months to recover!
Have you made the Choo-Choo Train Cake? Can you add any other tips or tricks? What’s the most difficult cake you’ve ever made? Have you ever been lucky enough to receive one of the AWW Birthday Cakes? Which one?! Pray do tell!
Linking up with Kylie for IBOT